Thursday, February 7, 2013

What is a pin up girl?

Marilyn Monroe, pin up the world's most famous of all time. (Drawing Leida Nogueira)
 The term pin up refers to a photographic and illustration style which is printed and designed to be nailed to a wall. This style emerged in the early 20th century, but became very popular during World War II. Like millions of young people spent weeks and months away from their namoradass and longed for an escape. The pin up girl became an indestructible part of modern popular culture and continues today. In fact, thanks to the internet, the pin up is more popular than ever and just a few clicks away. The style is classic and nostalgic with a nod of thanks to fashion, makeup, hair and a beautiful attitude exaggerated.

Popular Styles Pinup


    The Pinup art falls mainly into two categories: illustration and photography. The drawings pinup by Gil Elvgren and Alberto Vargas are legendary. Both would have used real models to pose for photographs and work, then draw idealized illustrations for printing. Numerous photographers used to mount style pinup photography pinup calendars. The styles were and are ideal, beautiful, innocent and very glamorous. Common themes in the past were, believe it or not, the housework sexy, beautiful beach girl with her dog, girl on her bike, girl in her bedroom, and so on. Just take a look at these lovely beauties.


 Pinup in the Digital Age

          
The pinup girl is alive and well in the internet age. The art of illustration is now almost without limit. The settings, the clothes, and cultural references used to stage pinup art is much richer than in the past. Artists blend different styles, such as comics, fantasy, sci-fi, fetish and of course, classic pinup. Pin up photographers do the same and get some spectacular results. Featured also you will see a lot of art in pin up tattoo. It's a great time for pinup!


 In HDs, a pin-up is simply an art that takes up a whole page, usually without dialogue, which displays a character or group of characters, or significant event, published in a special or regular edition and was not thought to become a poster.
In professional journals for fans of films and television series, a pin-up may represent a photograph of actors or actresses posed the issue at hand, but can also display specific scenes specially shot for disclosure purposes (called stills).
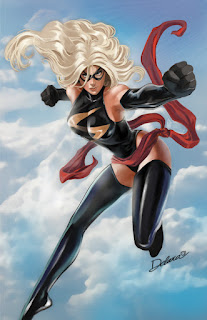


Well, that's it! :-)
I hope you enjoyed this post more.
And now that this one draw pinup? It's really fun to draw them, I love that style.
Good luck!

Wednesday, February 6, 2013

Drawing for beginners

WHAT IS DESIGN AND DRAW?


The design is an art that is as the first step to develop other arts such as: painting, sculpture, architecture, scenery and more.

    
Draw graph is by means of traces of a single color, two things that all image features: The shape and volume.
Though it seems hard for many people, everyone can draw from that observation to develop the ability and the strength of will, and very fond of drawing.
For this first lesson I prepared a first contact, where you will learn the first technical steps for the representation of this remark aimed at an introduction for beginners.

    
It is important that you have at hand all the necessary materials cited below:

    
* Graphite Pencil in the following degrees: 6B 3B (Koh-i-Noor or STAEDTLER or Faber Castel)
    
* A number Stump 03


The Stump is shaped like a pencil and paper or is made of suede, which aims to achieve shading of the drawing. The smoky allows obtaining a wide variety of shades of graphite, which indicated the use of soft pencils (HB to 6B). This technique smooths drawing lines and allows the combination of tonesar


* A utility knife or pointed
     * soft white rubber. It is natural that we use an eraser to correct minor errors. But the functions of rubber are not limited to this, can serve to draw outlines and shapes as well as to enhancing brightness of light and shadow effect.

     * Typing paper
     * White paper of A4 type canson (Canson or similar)
     * Slate Duratex (avoid tables because they are uncomfortable for the artistic design)

So let's begin this wonderful world of illustrations.

TIP OF A PENCIL AND LEARNING TO PLOT


To draw well, we need long tips, with soft angles to the graphite touching the side of the paper in its full extent, so:

If you prefer to point with his pencil stylus, use sandpaper to refine and regularize the tip.
With the pencil perfect, let's do a warmup:
 Using the clipboard as support, paper and pencil 3B, illustrate anything that come to mind, house, tree, car, dolls, and mainly geometric designs, like the circle, for example, try the circle as perfect as possible with a single motion. Draw ever faster and faster, without worrying about the result. Keep your hand relaxed, avoid pressing the pencil on paper, mild risk, avoid resting the handle on the clipboard, so that you can not draw more precise lines such as, for example, straight.

Training hard, just learn to slide the pencil on paper leaving a trail, which is nothing more than a LINE, our main tool.

     You can also adiquirir other special pencils that will make your drawings more realistic, which are:

     * Graffiti Hard: 8H, 7H, 6H, 5H, 4H, 3H, 2H, H
     * Graphite Medium: HB, F, B, 2B, 3B, 4B, 5B, 6B
     * Soft Graphite: 7B, 8B, 9B

There are several pencil mark for professional design, but just trying to find out which brands will become your favorite.

Still using paper, try to draw lines. Use whole leaves for each type of stroke: vertical, horizontal, diagonal, crossed, in every way possible. See the examples below:

Logical that in the early years, the lines appear crooked and misaligned. Do not give up! The intention is that your hand becomes light and firm for the design, as mentioned above. Even after achieving more satisfactory designs, always return to the track to improve by the day, with notions of parallelism and perpendicularity that will always be needed in all artistic representations.

The different types of paper increases the design possibilities, as each surface responds differently to the pencil.

Now that you've trained a lot and feels his features but interested in whether we learn to give perfect shape and volume in his drawings.

The shape


Capturing the shape of an image is to fix its different elements, define proportions, represent the movement.

In a way, we can say that the shape is that it gives individuality to the unit.

Analyzing a way we can determine the specific characteristics:

     * Appearance - how the unit performs.
     * Size - the relationship between the unit and other references.
     * The location - the place that occupies a unit in the visual field in relation to other forms: near or far, etc..
     * Orientation - shows how the unit: if facing up or down, right or left, etc..


VOLUME


Develop the volume of things is to situate them in space, using for that the relationship between light and shadow, lightand dark. Through the direction and intensity of the features you can create the feeling of volume and perspective.


Look at the illustrations and then try to reproduce them:


LIGHT AND SHADOW


Are the basic elements to produce the effect of volume on objects.
In a two-dimensional design, light and shade are elements that define and characterize the volume of the object. The volume is in conjunction with another form of the aspects that distinguishes objects that surround us. This depends on the light it receives, and thus the shadows it produces.


We can define two types of shadows, his own and those proposed.

The shadows themselves are the ones that originate in the object itself and the planned ones are that it produces in the neighboring areas.


You should also take into account the reflections caused by light, who design the neighboring surfaces or objects as they fade in the shadow own reflections.


Between light and shadow there is a transition zone or "shadow intermediary" that can vary in length depending on the intensity of light.

exemple:


As a simple exercise in shades of sombrameamento, you can make a TONE SCALE, which would be 9 squares, which you can change the tone of one color, can use the pencil drawing (2B or 4B or 6B, 7B or 8B or 9B), the graphite pencil with softer tones tend to make darker naturally, then you will have to be careful not to put weight on his hand, so do not mark the paper, harming future shading of his drawings.

* You can also practice with gouache